By the skin of my teeth

This morning, while driving on southbound Garland Road (TX 78) by White Rock Lake, I saw a careening, white Nissan Maxima headed the wrong way, barrelling down at me.

I could tell it was imminently going to swipe the Volvo wagon in front of me and was barrelling right at me from my left. So I jumped a curb and slammed on my brakes.

I ended up halfway on grass and halfway on a hike and bike trail:
image_00038.jpg
(All pictures are from my cell phone and have poor color balance.)

Luckily, no runners were in my path! I took longer than the Volvo to stop because the grass was wet with dew. Thank God for antilock braking!

If you look closely, you’ll see a Toyota Highlander about 100 feet in front of me. It also had to jump the curb. I guess the lady in the Volvo wasn’t paying good attention; she could have avoided the crash if she got off the road, although I may have then run into her?

Here’s where I launched off the curb:
image_00052.jpg
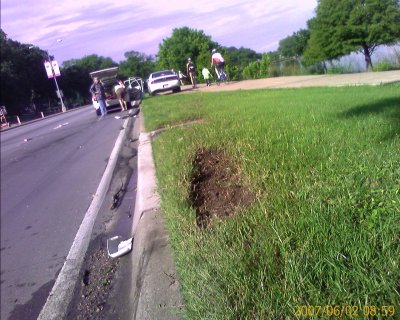
One of my left wheels did that.

I barely missed the careening Maxima.

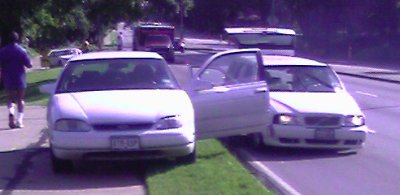
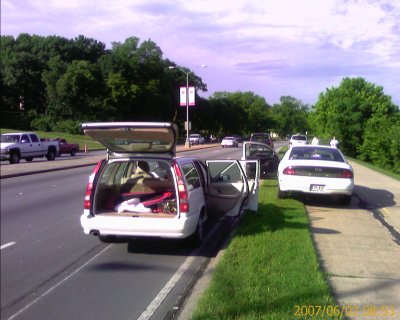
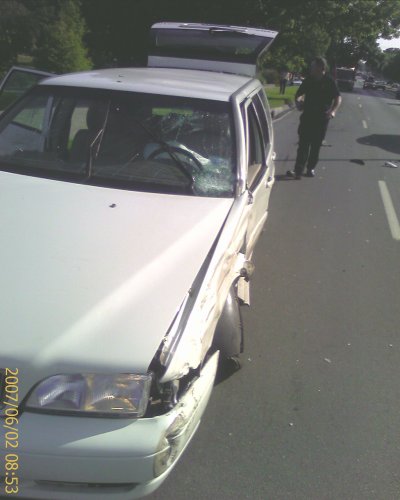
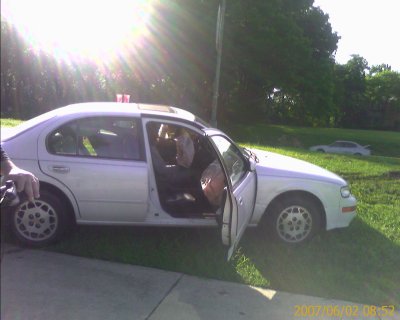
Once I realized I was OK, I jumped out of my car and checked on the lady in the Volvo. She was dazed and just wanted out of her car. She couldn’t open her driver’s door:
image_00040.jpg

Seeing that no immediate action was needed, I called 911. I had to ask her twice to shut off her engine as I was on the phone; she was too startled to remember to do that.

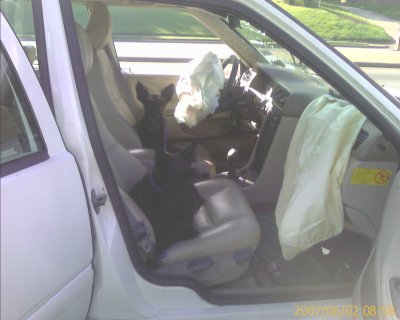
Fortunately, she was totally unharmed. Her dogs were also startled and unharmed:
image_00047.jpg
The Maxima’s driver appeared to be in more trouble. As soon as I was comfortable that the Volvo lady was OK, I asked a bystander to help her with her dogs so she could get out. I then went to the Maxima.

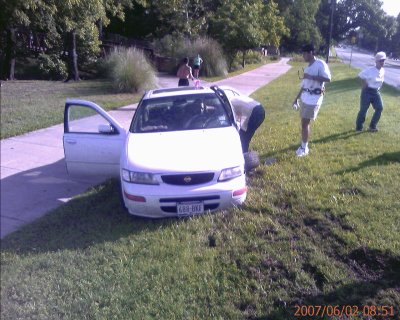
The Maxima ended up doing a 180:
image_00030.jpg

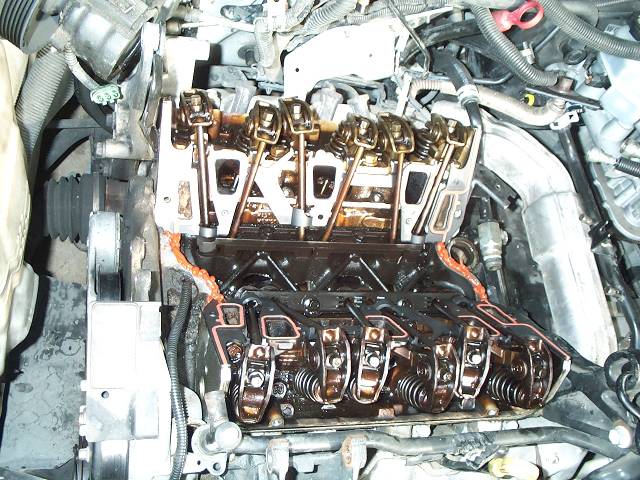
Plenty of people were attending to the guy by the time I got to him. At first, I thought his head was bleeding, but it turns out the guy’s rasta-style dreadlocks were hanging over his shoulder. He was shaking and in apparent mild shock. Bystanders were reassuring him. Since he looked OK, I didn’t interfere. His passenger compartment was intact:
image_00034.jpg
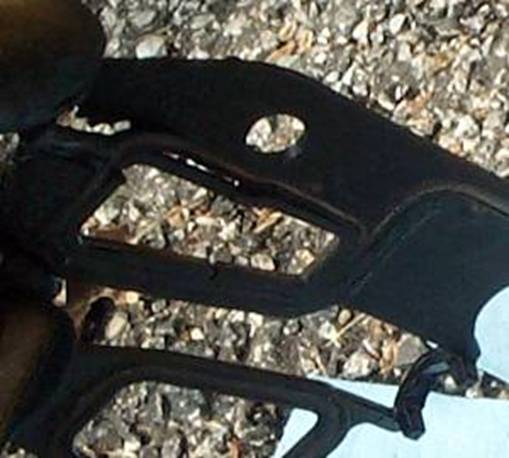
He was complaining of foot pain. That wasn’t surprising given the impact location:

image_00027.jpg

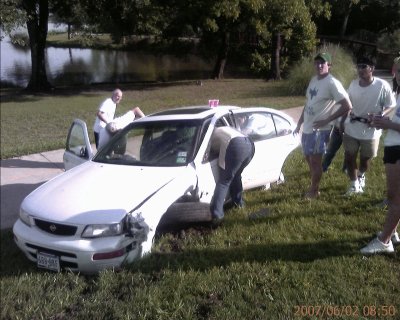
Anyone need a coil spring?
image_00057.jpg
(It’s right in front of the car.)

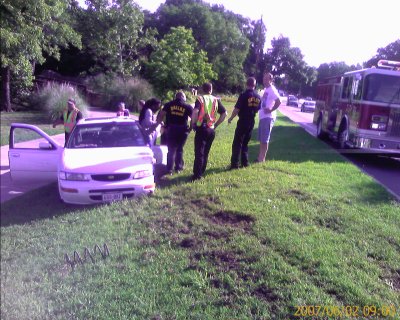
I asked the guy in the green cap to wait for the ambulance and flag it down.

Based on the timestamps in the picture, I guess the fire truck didn’t arrive until about 5-6 minutes after the crash, and the ambulance was about 1 minute later. This surprised me since the fire station is just a mile away, up the same road. But maybe that’s normal response time?

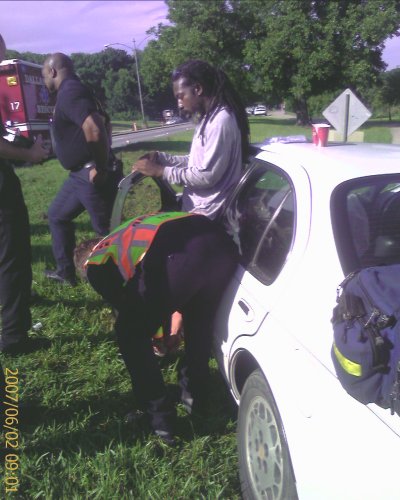
The paramedics got the guy on his feet, so I guess he was OK?
image_00059.jpg

The only cop to show up was a traffic cop (in Dallas PD, they wear red epaulets), and he arrived roughly 10-12 minutes after the crash. That response time shocked the heck out of me.

The crash appeared to be caused by an unobservant motorist who had to make a last minute lane change to avoid a slow-moving or stopped truck. The unobservant driver swerved into the Maxima’s path. In avoiding the unobservant driver, the Maxima’s driver lost control and careened into oncoming traffic.

Since I didn’t witness this part, the cop didn’t need me to stick around. After making sure the Volvo lady didn’t need more help (the emergency personnel weren’t helping her as she was unhurt), I took off for my meeting, which was about creating a foundation for White Rock Lake Park. Incidentally, my car ended up in this very park!

Do Volvos automatically blink headlights when the airbag goes off? I am not sure that a driver could make headlights blink:
image_00070.jpg

A/C Fun, Part 3

When I left off on this thread, I had fixed an electrical problem and buttoned up my A/C system, waiting to see if any leaks materialized.

The A/C ran decently on Monday, Tuesday, and Wednesday. In fact, Wednesday morning, the system dumped lots of condensation as I backed into a parking place. That’s a good sign.

Come Thursday, the compressor won’t kick on. Wiggling the clutch wire didn’t help.

After I put the kid to bed, I took a look. The high side service port cap looked off, so I checked it further and found it was broken. The center piece was still in the port:
100_0476_resize.JPG

And notice all the green around the port? That’s the color of leak detection dye!

The plastic piece came out easily with a pocketknife.

I mixed up some soapy water:
100_0482_resize.JPG
…and threw a little on the fitting and got bubbles:
100_0493_resize.JPG

Eureka, I found a leak! The complete lack of visible dye anywhere else suggests this could be it!

The next question is how do I fix this leak? I have a Schrader valve repair kit, but there is some rubber piece over the valve that prevents me from engaging it:
100_0513_resize.JPG
(This is looking straight down the valve.)

Looking two pictures up, you can see a clear hex pattern at the base of the service port. Does the port come apart? I’m going to check with a few people and figure this one out, hopefully soon!

Now here’s what I don’t get. I had enough refrigerant for the system to work acceptably on Monday, Tuesday, and Wednesday. Today, the pressure was almost 0 PSI:
100_0504_resize.JPG

How did it lose so much refrigerant so quickly? Was the service port cover actually retarding the refrigerant flow, and it finally broke under pressure, allowing refrigerant to escape more quickly?

Stay tuned. Once I locate vacuum pump oil, I’ll get this completely fixed.

A/C Fun, Part 2

Picking up from where I left off, I diagnosed that my ’97 Chevrolet Monte Carlo’s compressor does not engage, and I suspected an electrical problem.

Yes, it was an electrical problem. But an easy one.

I had one trick to figure out. I need to test voltage at the compressor. Only problem is the power connection to the compressor clutch is frighteningly close to the electric radiator fan, and this fan comes on when I turn the A/C on.

I found the wiring diagram in my Haynes manual:
Compressor relay wiring diagram

It shows that the signal for the compressor passes through a relay, shown at right. Terminals 2 and 5 are always hot, powered by the same fuse. When terminal 1 is grounded, that closes the switch inside the relay, allowing terminal 3 to power something. In this case, when the powertrain control module grounds terminal 1, terminal 3 activates a diode on the compressor that engages the clutch. Here’s the terminals on the relay:
A/C relay
I pulled off the relay and found that the relay’s terminals 2 and 5 are hot even when the ignition is on the ON position, the engine is not running, and the A/C is off. That combination is important because I have power available to the compressor but I don’t risk danger from a running engine or a moving radiator fan.

I used a paper clip to short terminals 3 and 5, emulating what the relay would do if activated by the powertrain control module:
Shorting relay terminals

Then I pulled off the compressor clutch wire. It was really nasty, so I cleaned it up with carburetor cleaner:
A/C compressor clutch wire hanging loose

I tested for signal:
Testing compressor clutch wire
Eureka, the light came on! So I have compressor signal.

I also cleaned up the fitting on the compressor:
Compressor clutch connection

Plugging it back in, the compressor clutch clapped into place! But I also found that there is something flaky with the connection. If I move it wrong, the compressor disengages. I ended up finagling it into a position that works, but I’ll have to investigate that further later.

Now that I can turn on the compressor, I can properly charge the system. All told, I added about 20 oz of R-134a to the system. After doing that, I got these pressures at about 2000 or so RPM at 82 degrees ambient temperature:
Gauge reading (205/26)
That’s 205 PSI high and 26 PSI low. I think those were OK readings. I later found the static pressure to be 83 PSI, which corresponded to a 78 degree ambient temperature. I’m not sure how to interpret that since the actual temperatuer was about 4 degrees warmer.

But what bothered me more is when I came back to the car about 5 hours later, the static pressure dropped to 76 PSI. In retrospect, in those 5 hours, the National Weather Service recorded a 10 degree temperature drop at Love Field Airport, and the engine bay cooled down significantly. Those alone could fully explain the problem.

Still, doing my due diligence, turned off all the lights and got out my UV lamp and checked for leaks. For a reference point, I checked the UV overspill on the low side port where I injected it:
UV dye on service port
The dye puts off a clear yellow color.

I checked all around the compressor and fittings and lines and couldn’t find any evidence of dye:
Compressor in UV light

Seeing no leaks, I added a few more ounces of R-134a to the system and called it a day. I’ll check the system once again tomorrow to verify that it has plenty of refrigerant and button the system back up.

My plan for now is to just run it until I notice cooling problems. At that point, I’ll verify pressures again and check for leaks.

I do have one theory for why this all happened, although I think it is wishful thinking. My low pressure service port had no cap. It is theoretically possible that debris got in there and caused a slow leak.

Over the next couple of weeks, I’ll find out if that is the case.

A/C Fun, Part 1

My ’97 Chevrolet Monte Carlo’s A/C is dead, and I am going to fix it.

Last fall, towards the end of A/C season, the compressor got really noisy. I could really hear it at low speeds.

Come spring, the compressor won’t engage at all. This probably means a refrigerant leak, faulty compressor, or electrical problem.

You might say that a loud compressor automatically means it’s new compressor time. Not necessarily, says an A/C tech who specializes in GM vehicles: variable displacement V5 compressors can be noisy with too little refrigerant.

My first test is to check the refrigerant pressures. First step is to assemble the gauges:
100_0357_reduced.JPG

I tried to hook up the gauges, but I could only manage to get the high pressure side on. Here’s its reading:
100_0360_reduced.JPG
That’s not good at all. It’s indicating about 8 PSI, meaning I definitely have a refrigerant leak. I don’t recall exact normal idle pressures, but I am pretty sure it’s over 70 PSI.

I removed the air cleaner box to get good access to the low side fitting. This is looking straight down:
100_0361_reduced.JPG

Since I already knew I have a leak, I sprayed in some dye. This dye will help me find the leak later: the dye will appear near the leak point. If it doesn’t obviously show up in daylight, I will be able to detect the leak using a fluorescent “black light.” Here’s the dye can:
100_0363_reduced.JPG

You can see how bright the stuff is on the low side fitting:
100_0365_reduced.JPG

I got both sides of the gauges hooked up:
100_0370_reduced.JPG

I introduced enough R-134a to get the gauges to read about 63 PSI:
100_0375_reduced.JPG

I turned the car on and still got no compressor action.

Dang, that’s not good.

At this point, it appears to be an electrical failure. I’ve already gone through all the relays and fuses I am aware of: the fuses in the dash fusebox, and the relays on the front passenger side of the engine compartment. I swapped the relays and fuses out with identical neighboring ones and got nowhere.

I am going to consult with some people before I go on to the next step. However, it looks like I may be in for some “real fun” soon.

Intake manifold replacement DONE

After church, lunch, Wal Mart, and AutoZone, I restarted work at around 4:00 PM Sunday.

It turns out that I had to remove every pushrod to insert the new gasket:

Here are the pushrods and the roller rocker assemblies are sitting in roller brush paint pans by the car:

On the pans I wrote whether they came from the front or rear and also noted L and R. All the pushrods seemed to be somewhat differently sized.

By the way, the old gasket was broken around the rear water ports:

You should not be able to see those small slivers of my driveway through the gasket. (I need to learn to take pictures in front of a better background…and get a better camera!!)

New gaskets are installed and end rails buttered up with “sensor safe” high temp RTV:

If you look carefully at the right side of the block, you will see a round opening. That is a port for a distributor. My car has no distributor. Spark is completely controlled by magical computer stuff, and I have three coil packs. This car has an interesting device to block off the port:

This is really the bottom half of a distributor! It has the gear that is turned by the camshaft, and it fits over a hex rod to presumably turn the oil pump. This engine is a great example of old junk engines that work fantastically with modern fuel and spark management systems. Notice the new O-ring from AutoZone. It’s probably not the “dealer correct” part, but I’m sure it’ll do.

By the way, the hex rod is a drastic improvement over my Nova’s distributor. On the bottom of the Nova’s distributor is a fitting that only meshes with the oil pump once every 180 degrees. The hex bit will work once every 60 degrees, and it’s much more likely that the hex bit will fudge itself into position than with my Nova’s fitting.

Here’s that piece in the block with its own distributor hold down clip.

Fast forward to 12:30 AM, and the engine is complete:

Yay! Two solid days of work finally done!!

I started the car up, and the only apparent problem is that the idle seemed rough. The SERVICE ENGINE SOON light blinked. This means that the engine needs service soon to prevent damage. I shut it off and fiddled with stuff, and I think the #2 spark plug wire was loose. I unplugged and re-seated all 6 spark plug wires. It ran great after I started it up. The SERVICE ENGINE SOON light was on again, but it wasn’t blinking. It was late, so I didn’t run the engine for long or drive anywhere, but I think the SES light may shut itself off after several seconds of running provided that something else isn’t wrong.

After around 19 hours of work, I am probably done with this intake manifold gasket replacement. Man, this is one job I hope to never repeat. The nice thing is that if I ever do it again, I can probably get it done in a day.

UPDATE: The SES light was a hoax. Someone helped me clear out a code on the car’s computer the next day, and the light never came on again. All I can guess is that the computer got flummoxed by all its sensors being disconnected and moved over the past two days.