New ball valve under kitchen sink

At the end of my prior dishwasher fiasco work, I was left with a bum dishwasher line and a leaking shutoff valve. The leaking valve is the one of the right:

No matter how tightly I cranked it shut, it the line would not stop dripping. Today, I rebuilt that valve with a Brasscraft shutoff valve rebuild kit. Somehow, I made the leak worse with that rebuild! That means this old shutoff valve needs replacement. I don’t think it’s more than 20 years old, so that surprised me.

To make matters worse, the line supplying my hot water valve on my kitchen sink started leaking on one of its fittings. You can see water collecting on it in this picture:

It may be correctable by simply tightening it up. However, since I want to replace the valves below anyway, and since the flexible line is of unknown age, I went ahead and replaced it, too.

I ended up getting a 3 way, quarter turn ball valve:

The brass cap on the right is where a dishwasher line will later feed into it the water supply when I get this new dishwasher.

Notice that the fitting on the bottom is not soldered. This compression fitting seemed scary, but they are apparently the de facto fitting for new installations where the lines don’t move much. If the lines are subject to a lot of movement, especially twisting motion, you still need to use an old-fashioned solder valve.

So far this contraption is holding up fine.

By the way, an experienced professional told me that the universal dishwasher line is usually fine. It could be that I had a defective line or a defective fitting. Either way, I am returning the $15 universal line back to Home Depot and picking up a more reasonably-priced $10 line from Lowe’s.

Rigid Dryer Vents Save Money

A few weeks ago, I replaced my flexible dryer vent with a rigid kind.

One of the premises is that the flexible vent increases fire risk. While I think that premise is way overblown, I changed the vent anyway to be on the safe side.

I now know that better dryer venting can dramatically reduce your clothes drying time! Drying a full load of jeans used to take 90 minutes. The new dryer vent cut that to 50 minutes.

Drying clothes costs real money, so this dryer vent replacement will make a welcome dent in my utility bills.

Final Score: Mice 1, Dishwasher 0, My Pocketbook -1

Some stupid mice “gifted” me another opportunity to do household repairs.

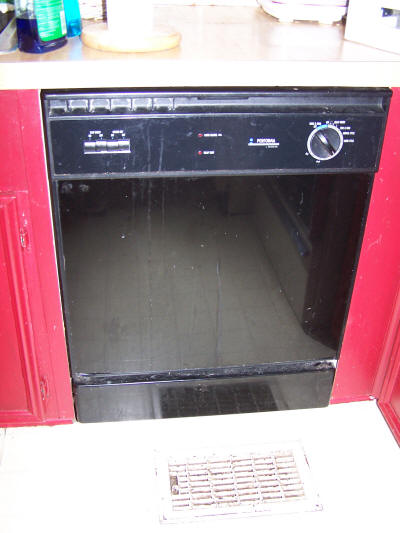
On Thursday night, I noticed the dishwasher sounding a little strange. Halfway through the cycle, I found the inside was bone dry. Further investigation found–gulp–the floor was soaked!

I removed the dishwasher’s bottom cover and found that mice ate up part of a line:

This is part of the line that runs from the pump to the top sprayer. Thanks to the holes, the pump just sprayed water underneath the dishwasher.

Here’s a close up, after I removed it:

You can make out mouse teeth marks.

I can’t work on this from underneath, so out goes the dishwasher!

This isn’t an easy-to-find replacement part. Since the dishwasher is 10 years old, 4 years past when Consumer Reports recommends to replace it instead of repairing it (I agree with that assessment), I knew I would have to do a repair on the cheap or just get a new dishwasher.

Here’s the opening behind the dishwasher:

The floor is dark because the wood is soaked. See that hole just right of center? Close up:

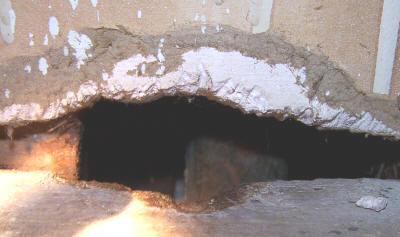
See the teeth marks? That’s a sewer vent pipe behind. I guess they scampered up that?

Over to the left, the stupid mice made the beginnings of a cute little nest with plastic bits and fiberglass.

Next step is to stuff steel wool into all holes. Steel wool should keep the mice out.

The hole to the right was probably not an access port, but it could have allowed the mice entry into an area below an adjacent cabinet. (No food was stored there; just pet supplies.)

Then I set up a fancy drying system:

That’s a regular floor fan blowing heated air into the dishwasher cavity.

After it got dry enough, I caulked the heck out of the remaining openings:

The floor is pretty dry by this point.

This is the side of the dishwasher after I cut off the damaged piece of the pipe:

And my totally awesome repair:

Automotive heater core hose clamped on each end with a hose clamp. I was sure this would work fine because the plastic tube linked up with the pump with a soft rubber piece and a hose clamp.

It’s hard to make out, but this is where the line connects to the pump.

I put a small wire cage on part of this line where it hits against a metal edge to prevent constant rubbing from tearing a hole in the line:

While I had things apart, I noticed that the power supply line is an unswitched feed that comes off the switch for the food disposal. I would rather have a way to shut off the dishwasher circuit without throwing a breaker, so this:

became this:

I had to play a little logic game to figure out which wire went where, but it works great now.

Shove it all back in, turn it on, and we’re ready for another 10 years of service.

Wrong!

The stupid dishwasher’s pump has a leak, unrelated to the mice!

Here is what happened after running it for just a few minutes:

The pump is leaking! I have no idea how long this has gone on. However, the lack of warpage on the wood suggests that this is a new leak. The jostling of getting the dishwasher in and out may have encouraged this leak. I don’t see how I could have created the leak per se; the pump couldn’t have struck anything. I think something was probably about to “give,” and the movement made it finally give up.

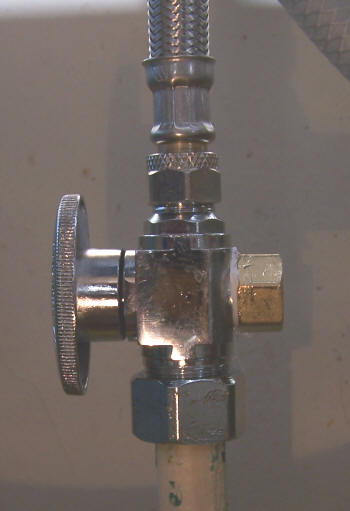
If that’s not enough, this dishwasher supply line also leaks:

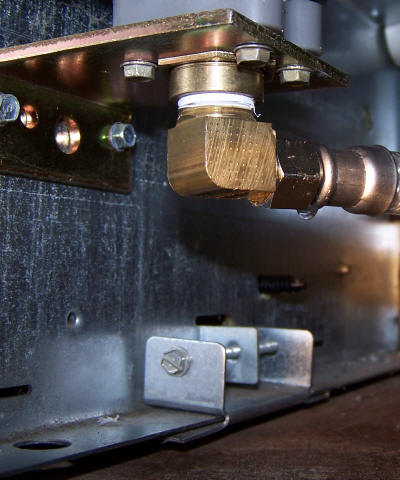
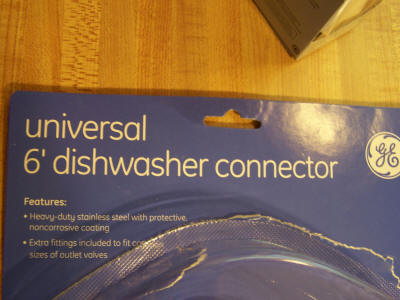
Let me tell you, this supply line is garbage. It’s an overpriced, $15 hose from Home Depot. Here’s the box top so you’ll know not to get it:

This piece of trash wouldn’t tighten. That is, it would loosen itself up some after each turn of tightening it. When I finally got it tight enough to stop backing out on me, it kept dripping. So I cranked it bit by bit until it stopped leaking, except that even after I knew I had applied way too much torque for a brass fitting, it still kept leaking!

Here’s what the end looked like once I got it off later:

Either Home Depot is selling complete trash for $15, or this product has poor quality control. $15 seems really high for a simple hose, anyway. I may check into something less expensive when I replace the dishwasher.

Yeah, that’s right, “replace.” It’s new dishwasher time. There’s no point in spending any more time on this dishwasher. It’s 10 years old and has outlived its economic life. Fortunately, Consumer Reports’s 3rd highest ranking dishwasher is a “best buy,” so a replacement shouldn’t hurt my pocketbook too much.

Rigid dryer vent eliminates minimal fire hazard

After getting a hoax email on the fire danger of dryer sheets (see Consumer Reports’s refutation), I remembered that I need to replace my flexible dryer hose with a rigid type. Apparently, rigid hoses are less of a fire hazard because they don’t collect lint.

My flexible hose setup:

Notice the nice sag in the middle to (theoretically) catch lint:

In fact, closer inspection showed the entire duct was pretty clean despite 3 years of use. The worst part was actually near one of the ends:

Far from clogged!

The inside of the dryer and the outside vent were clean:

So much for the dire warnings of dryer lint fires!

Next I installed the rigid vent. All I needed were two elbow connections and a 2 foot straight section. This is the first elbow, inserted into the outside vent:

Then I cut the middle section to fit, using about four test fits to get it right:

The tubing is thin, so I was able to cut it with traditional, black-handled scissors. (It comes in a sheet; you snap the the length side together along a seam.

A picture of the top, with the seam visible on the bottom right:

Then, with a little coaxing and finagling, I got it in place:

In only 40 minutes, I eliminated a trivial fire risk! Yay.

I think the dryer may run more efficiently. The exhaust no longer goes through a long, snaking tube.

Sick grass

I am trying to diagnose a possible SAD infection of my new Palmetto St. Augustine grass. Even though Palmetto is advertised as a superior St. Augustine, it appears to easily catch diseases.

These are images of “sick” parts of my grass. I am not sure if I have SAD or downy mildew or something else. While some pieces of grass show SAD-like symptoms, most show strong symptoms of downy mildew or fungus.


You can barely make it out, but this blade has parallel stripes running down its length.


Another blade with stripes and burn marks.


Stripes and burn marks readily apparent.


The lighter-colored areas are where the grass is discolored. The grass on the left half is the “new” grass from Sept. 2006. The grass on the right is old grass. The grass in the foreground is some native (?) bermuda that grew over a spot where I filled in some dirt.


More representative grass sections.


Here’s a piece showing SAD-like symptoms and burn marks.


Another view with other striped grass blades shown more prominently.