UPDATE (the next day): I scored each of the 17 reasons why Android is better than iPhone (and four areas where iPhone is better), and the net score tells me to keep the iPhone.
I don’t understand why people like the iPhone so much. After 10 days, I am unimpressed. I wrote about my experience at iPhone is inferior to Android.
I’ve switched back to my Pixel 4 XL. If I don’t miss the iPhone in a couple of days, I’ll return it.
Do you want the whole world to see your shared Google files? It’s easy to make this mistake. You can avoid by only sharing with people who have Google accounts. Here’s how.
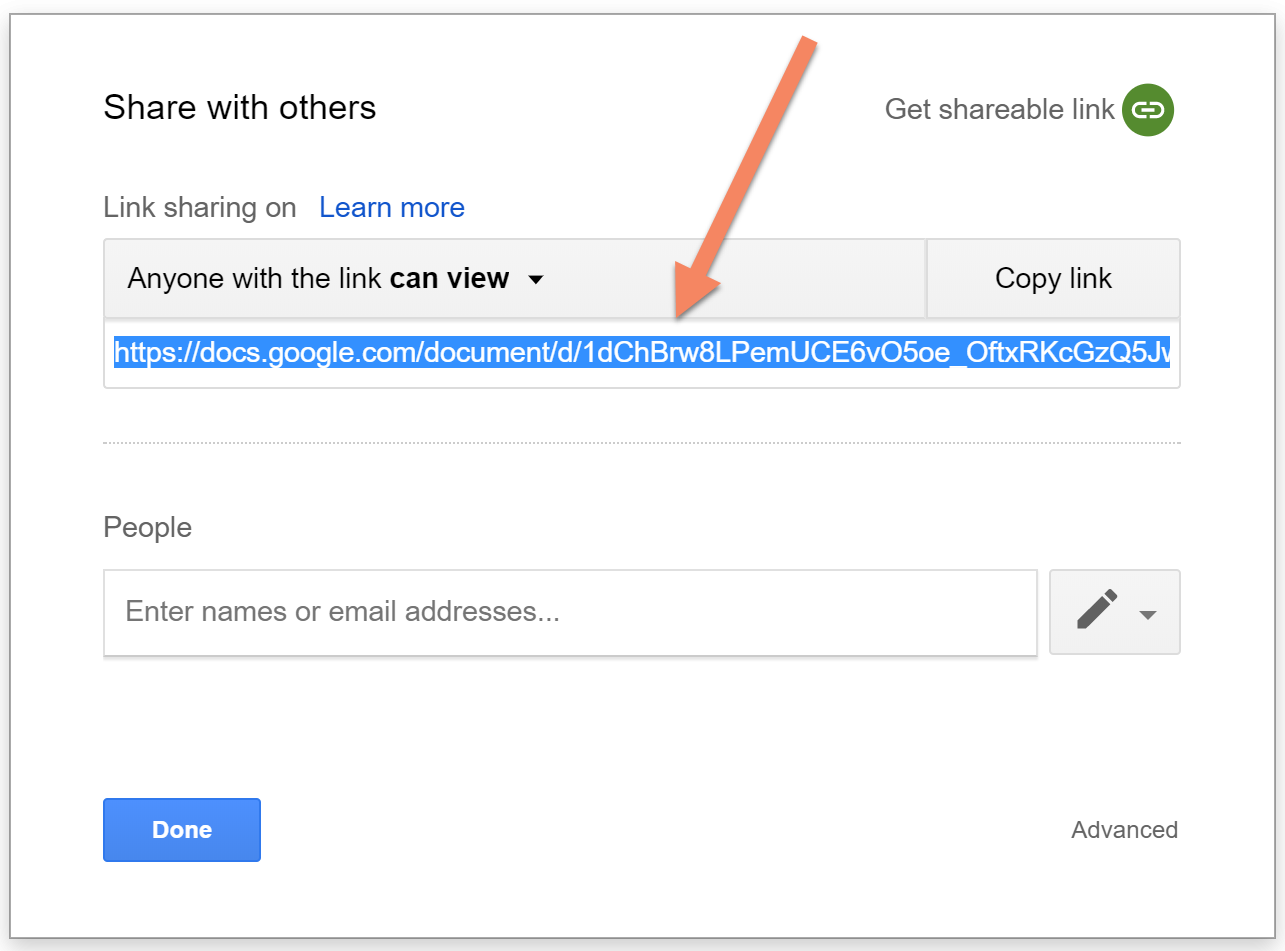
When viewing a Google file, on the top right is a Share button. Click on it to open the Share with others dialog. That is where you share your file.
In this dialog, if you use the Get shareable link feature, you made a link that anyone can use to see your file:
Share with others dialog with link sharing enabled
Anyone with that link can see this file!
Oh, you only emailed that link just to one trusted friend? What if his email is hacked? What if he shares the link, even accidentally? Suppose the link ends up where Google’s search engine can see it? The file will be in Google’s public search!
Fixing this is easy. In the Share with others dialog, click the Anyone with the link… dropdown, select OFF, then click Done.
Another way to over-share is when you add people. Let me be clear: it’s more secure to add people instead of sharing a view link. When you add people, the person you shared with gets a link to the document, but Google won’t allow viewing unless the person is signed in with the account you shared the link to. If the recipient shares the file’s link with someone else, that other person cannot view the document!
A catch: the people you share with must have Google accounts.
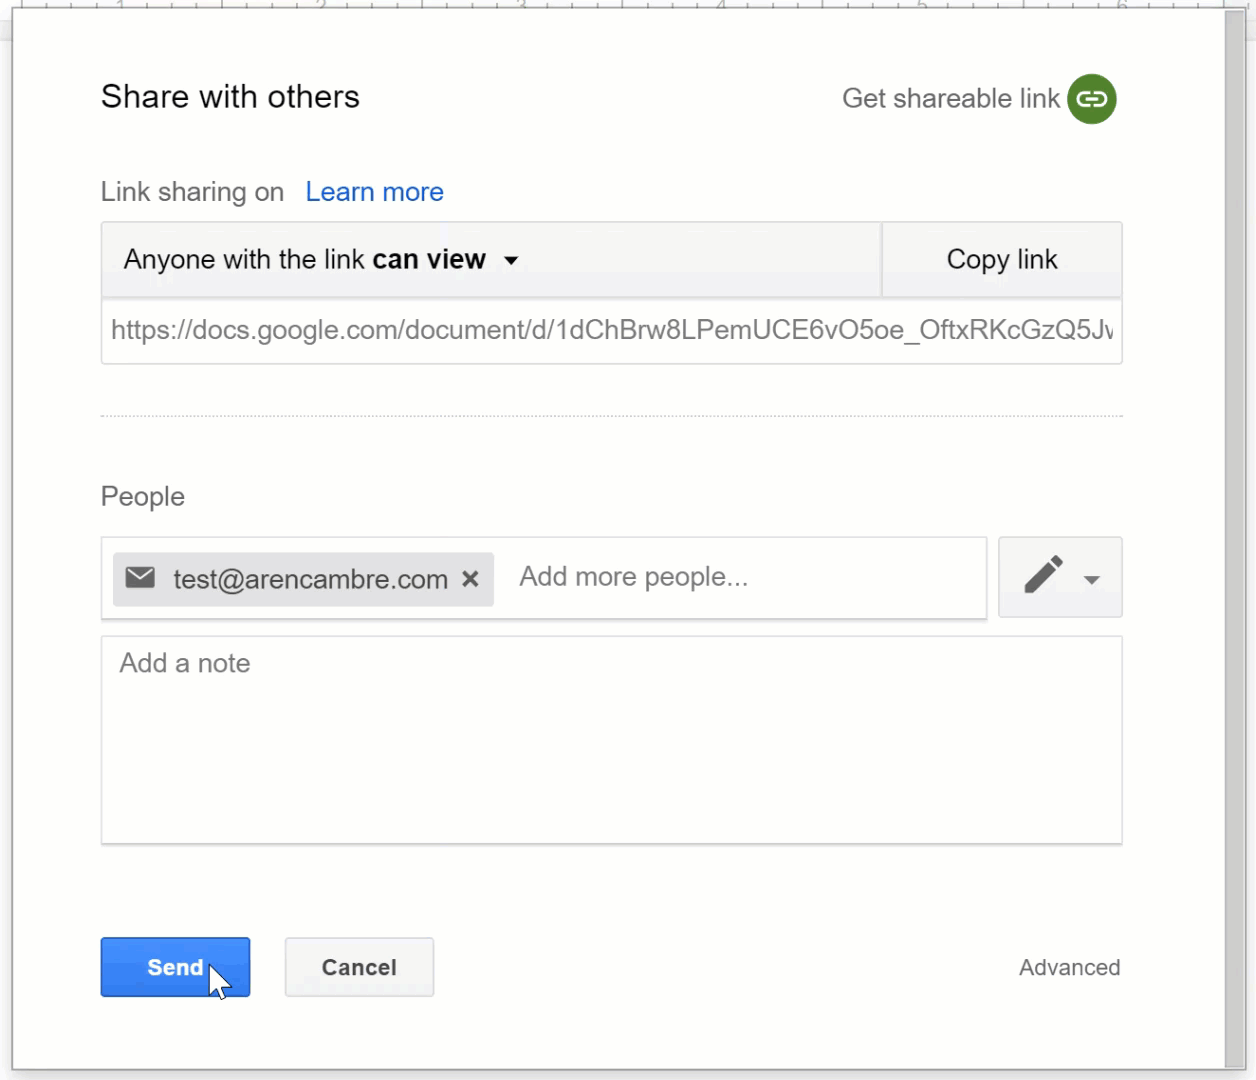
Watch this. It shows what happens when you share with someone without a Google account:
What happens when you share a Google file with someone who doesn’t have a Google account
Did you see this text: “Link sharing is ON. Anyone with the link can view”Don’t use that! If someone doesn’t have a Google account, then Google has no way to know if that person is who is viewing the file. Therefore, it sends the same kind of link mentioned above: it lets anyone view the file!
What does “Google account” mean? It is an account used to sign in to Google systems. The account name is the person’s email address. People with Gmail addresses already have a Google account. People with other email addresses may set up a Google account at https://accounts.google.com/SignUp.
How to avoid sending a view link: When you share to people who don’t have Google accounts, always select the Send an invitation option. With that, the recipient gets an invite to set up a Google account. Until that is done, the link won’t let the recipient view the file.
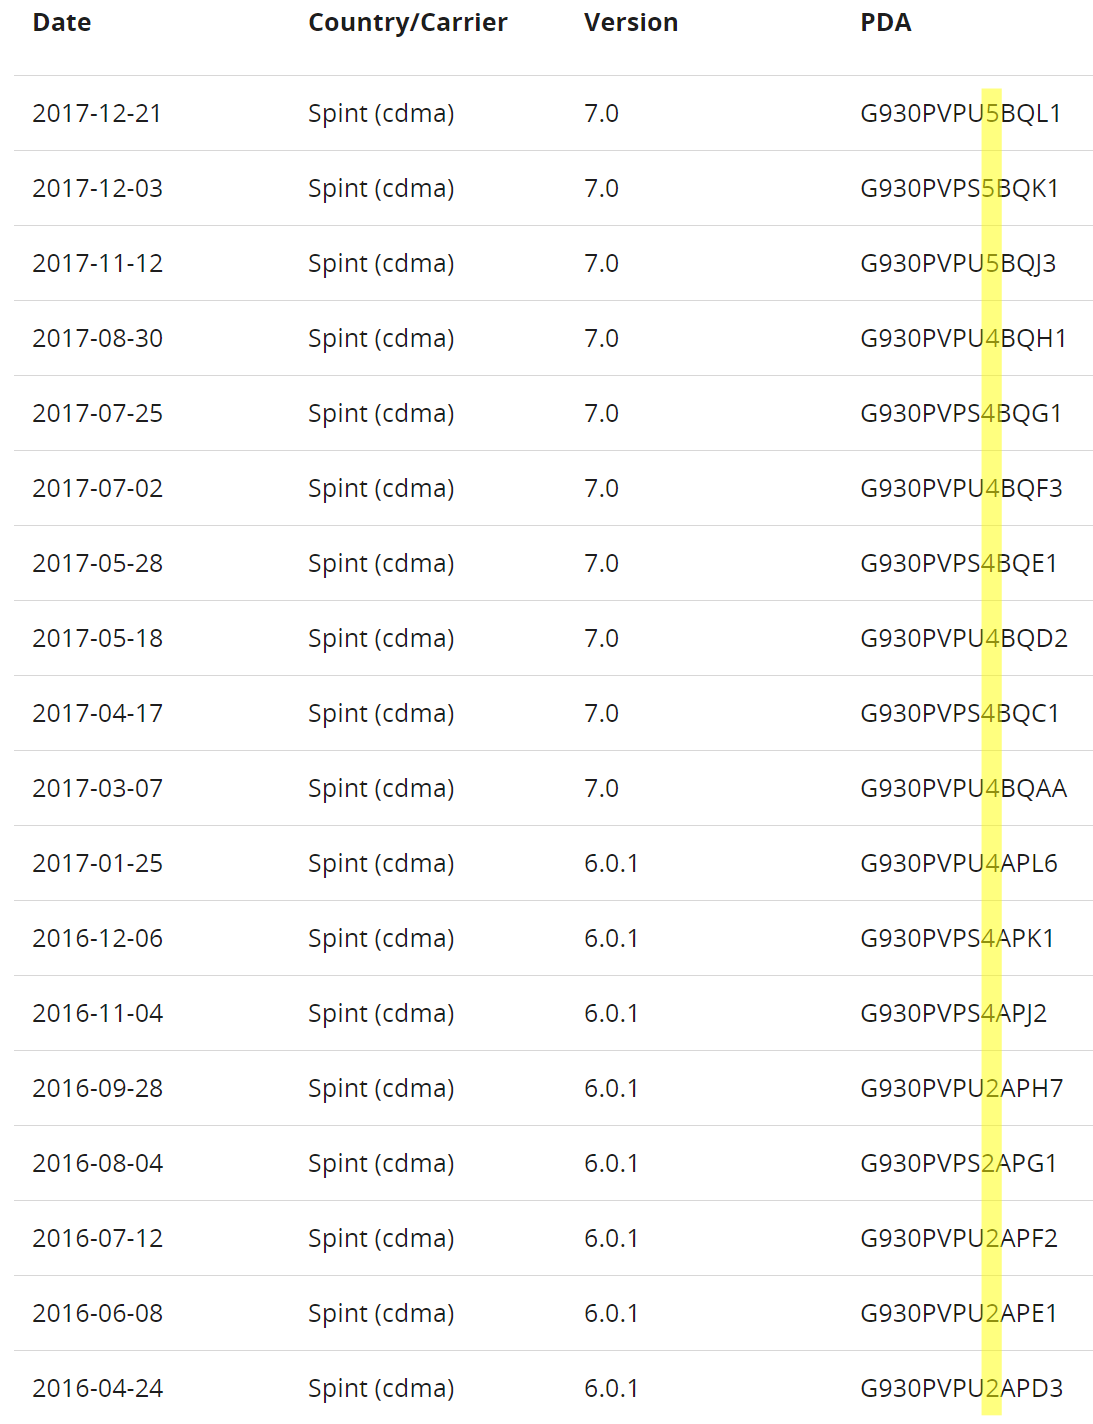
In late November, I was on the QJ3 update (last three digits of firmware). Its number is 5.
I tried to switch to the SM-G930U firmware. That would make my S7 an unlocked phone, which should free it of Sprint-specific customizations.
At the time, the latest Sprint-compatible* SM-G930U firmware was G930UUEU4BQJ5. Note the 4! When I tried to install that, I got an error saying that the version I am trying to install is lower than the fused version. This was the error:
SW REV CHECK FAIL : [ABOOT]FUSED 5 > BINARY 4
Note that “ABOOT” means the Android bootloader. This is a small, critical piece of software that kicks off everything else when you start the phone. The yellow-highlighted number in the above picture is in fact the bootloader version!
On the S7, Samsung has eFuses that indicate the bootloader version. When enough eFuses are tripped for bootloader version 5, I can’t install bootloader version 4. When an eFuse trips, the circuit permanently changes. I can’t un-set these eFuses.
Samsung’s eFuses became notorious in the custom ROM community a few years ago. Samsung’s Knox security would trip a warranty fuse if you installed unauthorized firmware. You can’t reset the warranty fuse. Warranty fuse-tripped phones work fine, but there are anecdotal reports of Samsung refusing warranty service due to tripped warranty fuses.
This firmware change didn’t trip the Knox warranty fuse. It’s because all US-market Samsung S7 phones are hardware-identical: the only difference between Sprint, AT&T, unlocked, etc. S7s are the software! All Samsung- or carrier-issued firmware types, intended for the US market, are Samsung-authorized on any Samsung S7.
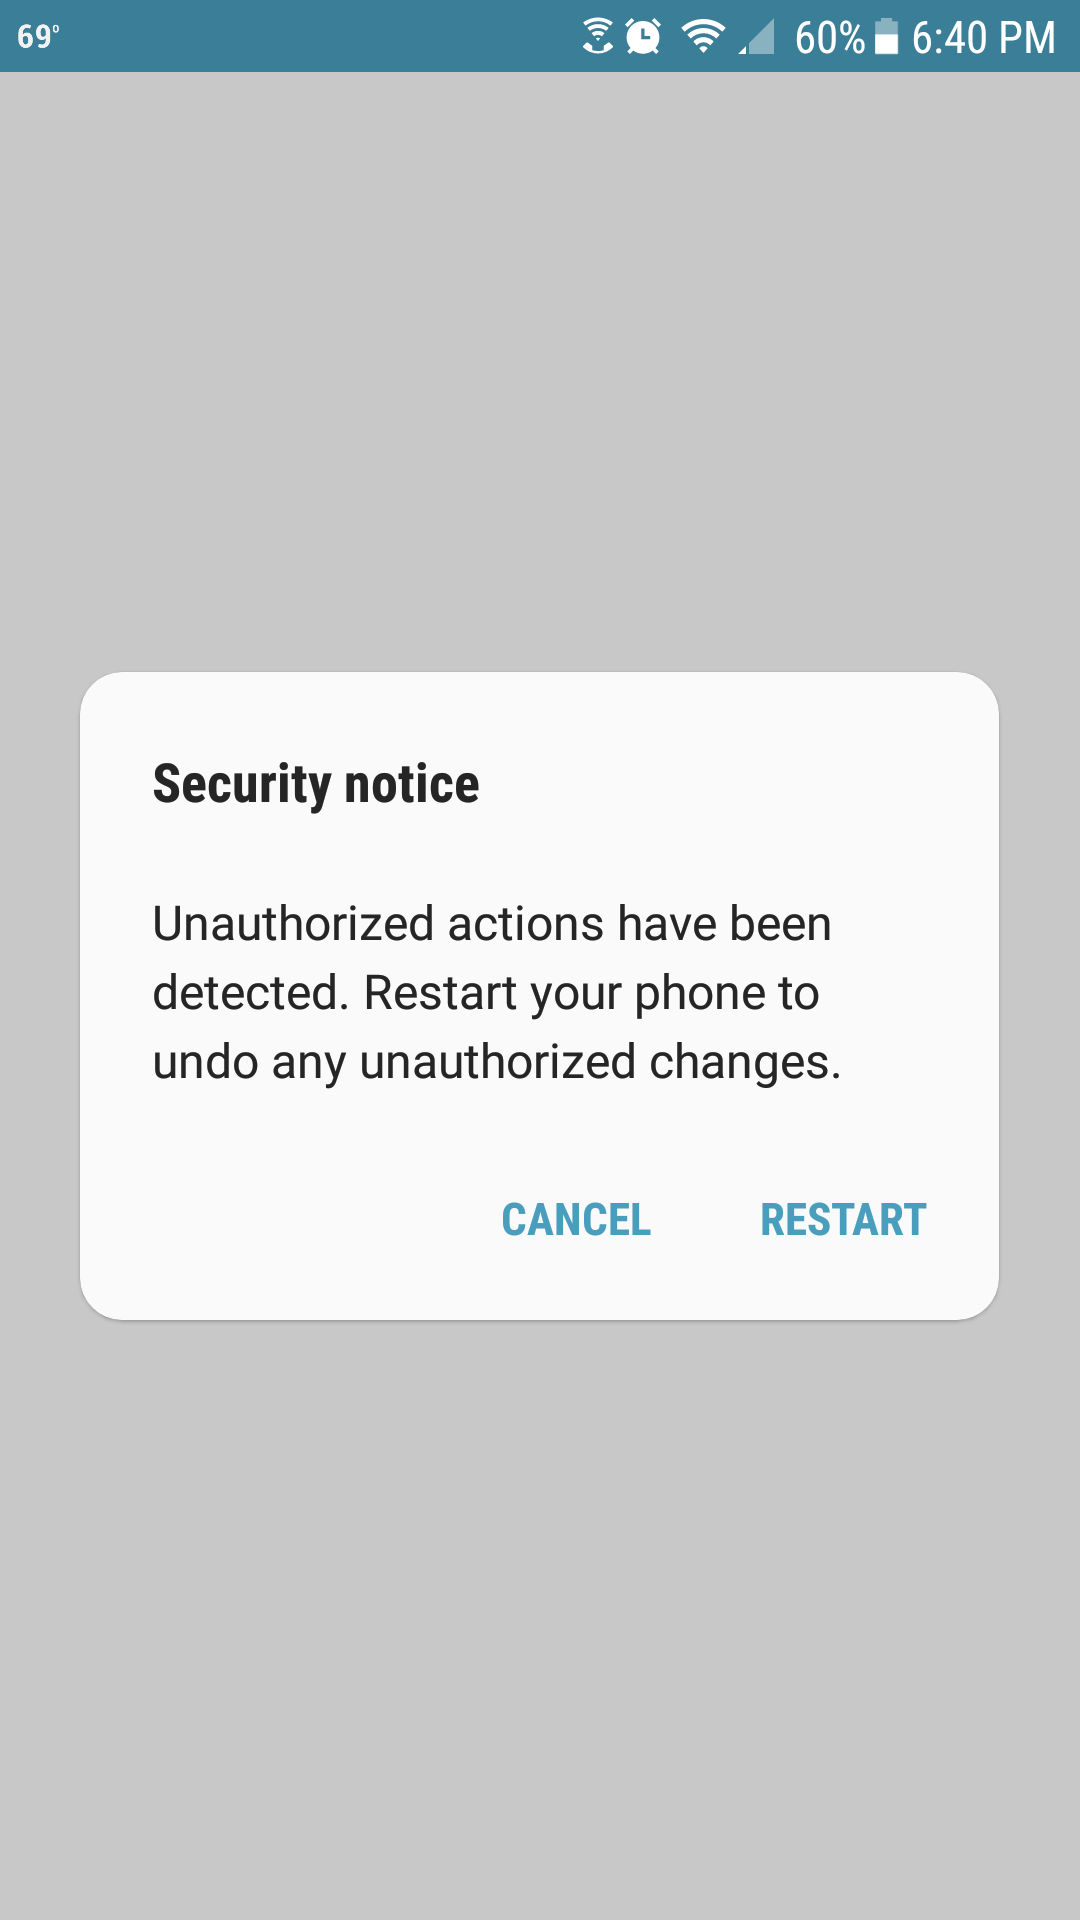
Back to the story: When you install firmware on Android phones, you are installing four pieces of software: the bootloader, modem (handles the cell network communications), Android core software, and carrier- and region-specific Android customizations. It turns out this version lockout doesn’t stop you from installing older modem software. Due to my determination, I managed to install older SM-G930U (unlocked) modem software. I was still on current-version SM-G930P (Sprint-branded) for everything else. Because of that version mismatch, I got security warnings:
Samsung S7 security warning, for when part of your firmware has a version mismatch
The phone still worked fine.
Why didn’t I just get the newer firmware and be done with it? No download site had QJ3 despite it being out for a few weeks!
About a week later, I could download the correct firmware. I installed it, and everything went back to a happy state. I’ve since installed two more over-the-air updates from Sprint with no problems.
*I don’t understand why an “unlocked” phone has carrier-specific variants! Isn’t unlocked supposed to mean “not carrier-specific”? Here are SM-G930U variants (source):
I have the Motorola Moto X Pure Edition (2105). It’s a great value, it’s unlocked, and it works on all major cell networks.
The phone worked great until this weekend. I went to Dinosaur Valley State Park near Glen Rose, TX for a campout with my Cub Scout pack. (I am Cubmaster.)
Glen Rose is in the middle of a large Sprint coverage gap, but at least there’s voice roaming:
(from Sprint’s Coverage Check page)
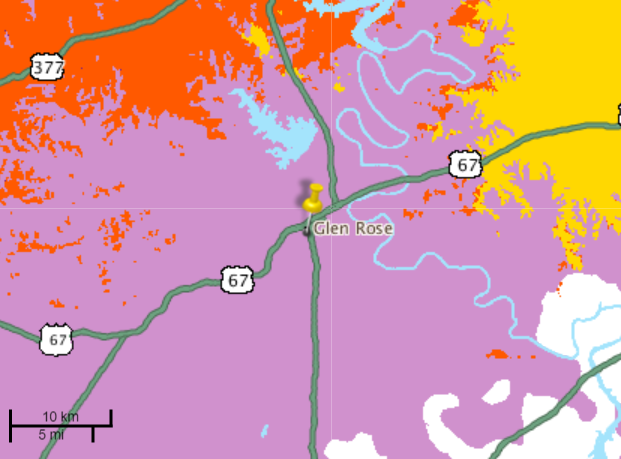
And here’s the data coverage, which is “off-network roaming”: (from Sprint’s Coverage Check page)
The data roaming is only in theory. When I crossed into the roaming zone (westbound US 67 east of Glen Rose), I only had voice, no data.
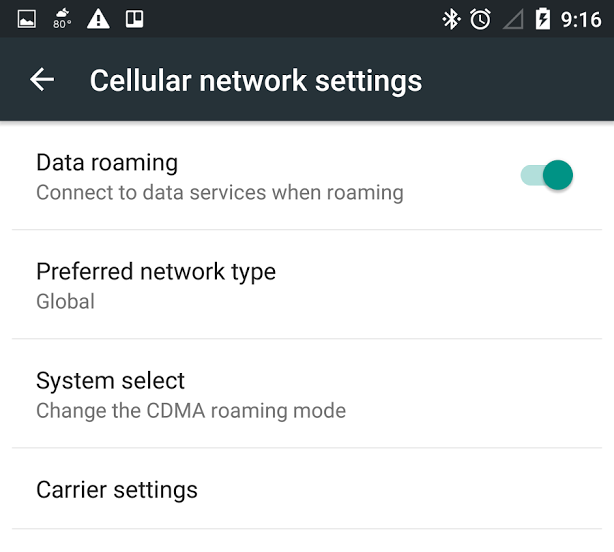
Later that night, perplexed at the lack of data, I reviewed my phone’s roam settings. In the settings, I hit More under Wireless & networks, then Cellular networks. Here’s the dialog (notice the empty signal indicator to the left of the battery indicator):
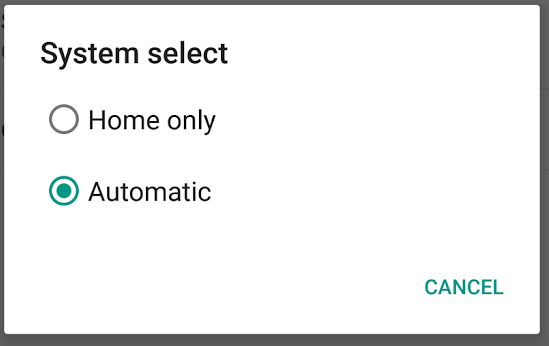
Below is what you see when tapping on System select:
I changed this from the default Automatic to Home only. Predictably, the roam network disappeared. Changing back to Automatic, the roam network was still gone! Power cycling the phone had no effect.
What?
The Preferred network type dialog had no effect. Here’s its default setting:
None of the other settings had any effect. I also tried toggling the Data roaming slider, but it had no effect. That makes sense because the phone detected no network anyway.
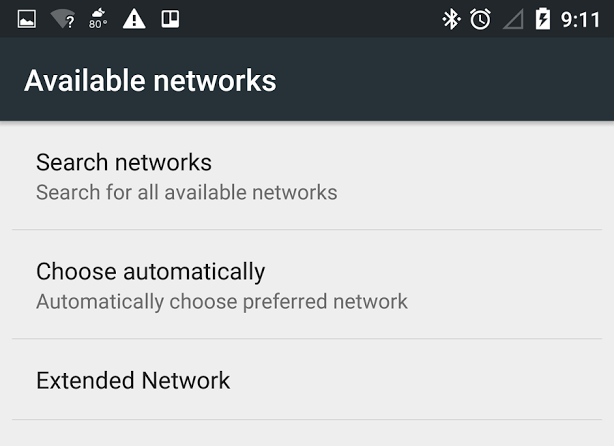
Somehow I got this alternate settings screen. I do not remember how I got that. Regardless, it had no effect. Here it is:
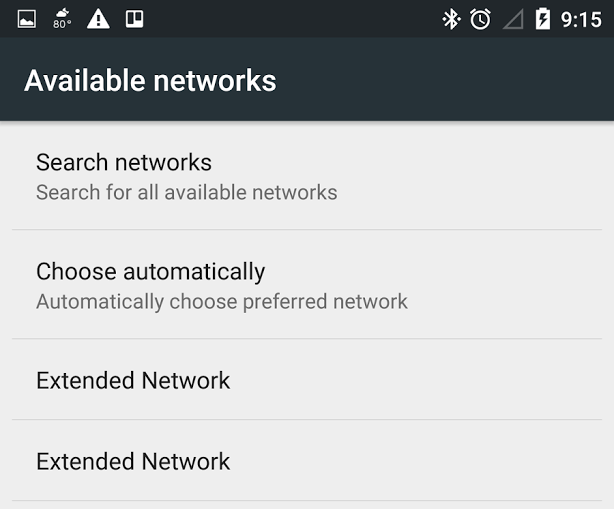
Sometimes I got a version of this that had twoExtended Network selections:
Clicking on any Extended Network selection on either version of this settings screen had the same effect. You first see this for a while:
Then you see this:
I also explored the Search networks and Choose automatically settings, but neither had any effect. The presence of Extended Network at the bottom makes it look like the phone in fact saw a network.
Ultimately, I got no cell access for the weekend. When we went home, I got an avalanche of text messages between Glen Rose and Cleburne. (They were alerts from an unprecedented IT outage at my employer.)
Did I need to update my phone’s preferred roaming list (PRL). I think no. First, if my PRL was bad, I wouldn’t have gotten any roaming as I traveled to Glen Rose. With the current PRL, I should have at least had voice the entire weekend. Second, I activated this phone just 13 days prior to the trip. Since the phone is unlocked and carrier agnostic, it would have to update its PRL upon activation. Even if an old PRL was buried in the phone, the lack of Sprint access at Glen Rose is not new, so a very old PRL ought to work fine.
What do I do? Is the Moto X unable to reliably roam if Sprint is my network? Have Motorola or Sprint acknowledged a bug?
Error 0x80270113 is yet another mysterious Windows error that Microsoft doesn’t explain well. First, some background:
OneDrive for Windows 8.1 supports online-only files. It’s a great idea: these files look normal, but they take up almost no space. That’s because they actually only exist in Microsoft’s cloud and are not on your hard drive.
If you right-click on an online-only file and select Properties, you’ll see that the Size on disk field is just a few bytes. It’s only a stub file. If you open the stub file, OneDrive transparently downloads the full copy.
In theory, online-only files are a great way to share files across multiple devices that may not have enough drive space to copy all of them locally. Strangely, Microsoft is ditching online-only files for Windows 10.
Error 0x80270113 happens when Windows doesn’t know how to open a OneDrive stub file. Here’s how it happened to me:
I am quitting OneDrive because it’s slow. I have several gigabytes of files in OneDrive. I need to move them out of OneDrive.
Normally, moving files is a fast cut and paste operation. Normally, the file itself isn’t moved. Rather, a few bytes of filesystem data is tweaked to tell Windows that the file is in a new folder.
This is like adjusting highway signs to tell people a new route to a city. The city is still in the same place; all that changed was the route you take to get to the city.
Moving files out of OneDrive is like moving the whole city! Even if you aren’t using online-only files, moving files in or out of your computer’s OneDrive folder is a pokey copy-and-delete operation. With this, a copy of the file is made in the destination location, then the file is deleted from its source location. This is exponentially slower than a move.
As I have many gigabytes of files to move, I got impatient on the long wait. I stopped the move, shut down OneDrive, and used PowerShell’s Move-Item command to do a classic file move operation.
Oops! Move-Item isn’t aware of OneDrive, so it happily moved the file stubs without downloading them first. Only when I tried to open the OneDrive stub files when they were outside of the OneDrive directory did I get the 0x80270113 error! The error probably means is that you have a stub file outside of its OneDrive directory, and Windows doesn’t know how to deal with it.
To make things worse, after I moved all these files out of OneDrive, the OneDrive agent synchronized my now empty OneDrive folder, which caused all the online copies of the files to be deleted. (That is actually correct behavior: if you get rid of a file locally, it should also be removed from the online drive.) This means I was left with only stub files on my hard drive and an empty OneDrive. Is my data gone?
Luckily, OneDrive has an online Recycle Bin. I restored everything from the online Recycle Bin back into OneDrive. My local OneDrive agent then set up online-only stubs of all these files. Now I can use the Windows Explorer’s cut and paste feature to move these files out of OneDrive. I’m pasting them in the same location where I moved the files using Move-Item. With this operation, I am telling Windows Explorer to overwrite the stub files in the destination. This overwrites the tiny stubs with actual data.
At this point, you may ask, “Why did you move your files using Move-Item if you had set them to be online-only?” Answer: I never set any files to be online-only on this PC! I don’t know why that happened. All I can guess is one of:
OneDrive does this intentionally for some files.
OneDrive bug.
I had the OneDrive client running on two other PCs, and on both those other PCs, I set them to use online-only file copies. Perhaps OneDrive somehow carried that setting over to my main computer?
Regardless of why, this is a pain to deal with. I’m very fortunate that OneDrive’s Recycle Bin actually works!

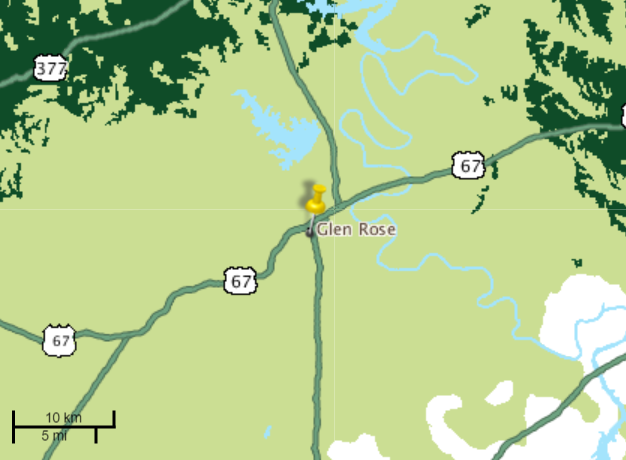
 (from Sprint’s