Show all Sitecore Active Directory users

I manage a Sitecore installation that’s integrated with an enterprise Active Directory.

We have over 11,000 accounts in our Active Directory. I needed a list of the Sitecore users, who are only a small percentage of the 11,000.

We have nothing in Active Directory that sets them apart, like group membership.

We architected our solution so that users are never assigned directly to items; users are members of Sitecore roles, and we assign Sitecore roles to items. All I have to do is rifle through all my Sitecore roles.

So how do I find my users? It took a little C#. Here’s the core code:

var roles = Sitecore.Security.Domains.Domain.GetDomain("sitecore").GetRoles();
foreach (var role in roles)
{
    foreach(var roleMember in Sitecore.Security.Accounts.RolesInRolesManager.GetRoleMembers(role, false))
    {
        if (roleMember.AccountType == AccountType.User)
        {
            var userObject = Sitecore.Security.Accounts.User.FromName(roleMember.Name, false);
 
            // only adding SMU domain users
            if (userObject.Domain.Name == "myActiveDirectoryDomain")
                AddUserToList(userObject);
        }
    }
}

This gets all Sitecore domain groups and extracts all users who are a member of my corporate domain. Of course, you’ll replace myActiveDirectoryDomain with your own domain name.

I created a separate AddUserToList method to handle adding these items to a Dictionary:

private void AddUserToList(User user)
{
    if (!_users.ContainsKey(user.Name))
    {
        _users.Add(user.Name,user);
    }
}

After the core code runs, you’ll need to code your own stuff to spit out what’s in the dictionary.

Here’s what I used:

foreach(var user in _users)
{
    var row = new TableRow();
    OutputTable.Rows.Add(row);
 
    row.Cells.Add(new TableCell { Text = user.Value.Profile.UserName });
    row.Cells.Add(new TableCell { Text = user.Value.Profile.FullName });
    row.Cells.Add(new TableCell { Text = user.Value.Profile.Email });
 
    if (user.Value.Profile.FullName.Length == 0)
    {
        row.CssClass = "alert";
    }
 
    var rolesCell = new TableCell();
 
    foreach (var role in RolesInRolesManager.GetRolesForUser(user.Value, false))
    {
        if (role.Domain.Name == "sitecore")
        {
            rolesCell.Text += "
 " + role.Name;
        }
    }
 
    rolesCell.Text = rolesCell.Text.Substring(7);
    row.Cells.Add(rolesCell);
}

Note that I already had a Table named OutputTable on my ASPX page.

Tadaa! The result is a list of all my domain members who are Sitecore users.

Upgrading hardened Sitecore content delivery environments

How do you upgrade hardened content delivery (CD) environments? Ours are so hardened that you can’t even get to /sitecore/admin/UpdateInstallationWizard.aspx.

Here’s how. It can be tedious, but these make it easier:

  1. CDs are mostly stripped-down instances of full Sitecore environments.
  2. Any needed database changes are handled when upgrading the content mastering (authoring) environment.

You only need to do 3 things on CDs.

But first, two notes:

  1. If you upgrade the CDs before you’ve upgraded the content mastering (CM) environment, you may have unstable CDs until the CM upgrade is done.
  2. Sitecore’s .update files are really Zip files. Just open it with your favorite Zip program, like 7-Zip, and it works like any other Zip file.

For each update file, do the following three steps. You must perform them in the release order of the update files, starting with the oldest release.

1. Add new or changed files

Extract everything in the addedfiles and changedfiles directories of the update file. You’ll extract them over the web root. Tell your Zip program to overwrite existing files.

2. Delete files no longer needed

This is the hardest part. Inspect the update package’s deletedfiles and deletedfolders directories of the update file. Every file (not folder) under each corresponds to a file or folder under your web root that needs to be trashed.

Note the wording: “every file“. For example, in Sitecore 6.5.0 rev.110602_fromv640rev101012_2.update, there is a file named AuthoringFeedback under deletedfolders\sitecore\shell\Applications\Analytics. That means you would delete the directory at sitecore/shell/Applications/Analytics/AuthoringFeedback under the web root.

You may have to dig deeply and thoroughly to find all files and directories.

3. Edit .config files.

Do all .config file changes that correspond to the update package you just handled. A list of .config file changes are at http://sdn.sitecore.net/Products/Sitecore%20V5/Sitecore%20CMS%206/ReleaseNotes/webConfig.aspx.

Wrapping up

If you’re going through multiple upgrades, it’s tempting to do all them at once–do all the file additions at once, then all the file deletions, and then do all the .config changes. This might work as long as you work through the update files in their release order, starting with the oldest release, and if Sitecore didn’t delete something and add it back or vice versa.

For example, suppose you were doing four updates at once. In update #2, a file named x.png was deleted, but then it was added back in update #4. If you do all your file additions first, then do all deletions 2nd, your final state will have no x.png.

As long as you’ve been careful and did the CM environment upgrade first, the CDs should “just work” when done.

Google Maps API V3 geocoding with SharePoint 2010

This explains how to show addresses in a SharePoint 2010 list on a Google Map.

This article is based on Kyle Shaeffer’s Plotting Your SharePoint 2010 List Data on a Google Map. The main difference is I upgraded his method to Google Maps API V3.

Here’s how it’s done:

Create a list

Using SharePoint Designer 2010 (free download!), open your SharePoint site and:

  1. Under Site Objects, click Lists and Libraries.
  2. In the Lists and Libraries tab, click Custom List.
  3.  Enter MyData and press OK.
  4. Click on your new list, then select Edit list columns in the Customization section.
  5. Add a Multi Lines of Text field using the Add New Column button at top left:. Name it Address.

Create data view

Still in SharePoint Designer 2010:

  1. Click Site Pages under Site Objects on the left:
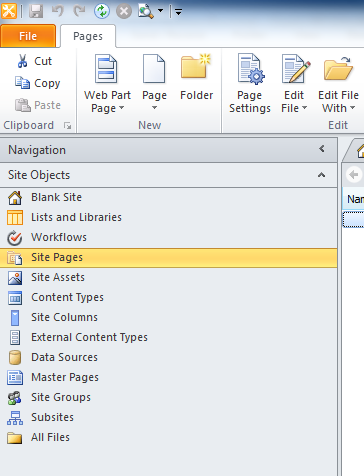
  2.  In the ribbon at top, select Page > ASPX. Name your new page map.aspx.
  3. Click on the new page, then click Edit file in the Customization section. If asked to open the page in advanced mode, click Yes.
  4. Make sure that Design or Split are selected at bottom. From the menu at top: Insert > Data View > MyData

Now you’ll see your data in a table in the page.

Add the JavaScripts

You’ll need to reference two script libraries: Google’s Maps API and jQuery.

Find the opening <form> element in the source code. Right after it, paste this code:

<script type="text/javascript" src="https://maps.googleapis.com/maps/api/js?key=API_KEY_GOES_HERE&sensor=false"></script>
<script type="text/javascript" src="https://ajax.googleapis.com/ajax/libs/jquery/1.7.1/jquery.min.js"></script>
 
<div id="map_canvas" style="width: 98%; height: 400px"></div>
 
<script type="text/javascript">
// set up the basic map object
var latlng = new google.maps.LatLng(34.603885, -4.626009);
var myOptions = {
	zoom: 2,
	center: latlng,
	mapTypeId: google.maps.MapTypeId.ROADMAP
};
var map = new google.maps.Map(document.getElementById("map_canvas"), myOptions);
 
// this is used for geocoding
var geocoder = new google.maps.Geocoder();
 
function codeAddress(address, theName) {
    geocoder.geocode( { 'address': address}, function(results, status) {
      if (status == google.maps.GeocoderStatus.OK) {
        var marker = new google.maps.Marker({
            map: map,
            position: results[0].geometry.location
        });
      } else {
        alert("Geocode was not successful for the following reason: " + status);
      }
    });
}
 
// this is called with body's onload to pull addresses after the page is done loading.
function initialize() {
	$("tr.ms-itmhover").each(function(i){
		codeAddress($(this).find('.ms-rtestate-field:eq(0)').text(), $(this).find('.ms-vb-title:eq(0) a').text());
	});
}
</script>

Replace API_KEY_GOES_HERE with your own Google API key. Don’t have one? Get it at https://code.google.com/apis/console/. Be sure to get a Google Maps API v3 key! v2 is deprecated.

Now you need to add an onload attribute to your body tag to fire off the initialize function:

<body onload="initialize()">

Viola! You have a map that dynamically pulls from the below list!

Caveats

The initialize method works by scraping from the rendered HTML. It’s finding every tr with class ms-itmhover–which is what is produced by the data view you inserted above. Then within each of those trs, it finds:

  • The first item with class ms-rtestate-field and gets its text contents. This will be your address.
  • The contents of the a tag within the first element with class ms-vb-title, which is the title field.

You’ll have to do JavaScript surgery if you change fields in a way that alters this. For example, if another multi line text field displays before your address, you’ll have to change .ms-rtestate-field:eq(0) to .ms-rtestate-field:eq(1). Or you’ll need to alter the XSLT behind the data view to produce some other classes or code.

Also, because this uses JavaScript to scrape the screen’s contents, you must deliver the data list in the page . It doesn’t have to be visible–you can make it invisible with CSS. If you don’t want the data to be on the page, you’ll need to use more sophisticated techniques, possibly some kind of AJAX.

Hiding Active Directory user IDs from WordPress author slugs

I recently set up a corporate WordPress blog system. With the Active Directory Integration plugin, users can sign in with their corporate ID and password.

But here’s a problem: each blog post has a link to the author’s profile. That profile’s URL includes the user ID. The corporation’s security standards say we can’t expose user IDs to the world, so the author profile URLs have to be sanitized.

It took a while to figure out a solution, but the end result is reasonable.

I found this post at StackExchange’s WordPress site. Adding the first two code snippets (below) to the end of wp-config.php tells WordPress to use the user’s nickname metadata to construct the profile URLs:

add_filter( 'request', 'wpse5742_request' );function wpse5742_request( $query_vars )
 
{
 if ( array_key_exists( 'author_name', $query_vars ) ) {
 global $wpdb;
 $author_id = $wpdb-&gt;get_var( $wpdb-&gt;prepare( "SELECT user_id FROM {$wpdb-&gt;usermeta} WHERE meta_key='nickname' AND meta_value = %s", $query_vars['author_name'] ) );
 if ( $author_id ) {
 $query_vars['author'] = $author_id;
 unset( $query_vars['author_name'] );
 }
 }
 return $query_vars;
}
 
add_filter( 'author_link', 'wpse5742_author_link', 10, 3 );
function wpse5742_author_link( $link, $author_id, $author_nicename)
{
 $author_nickname = get_user_meta( $author_id, 'nickname', true );
 if ( $author_nickname ) {
 $link = str_replace( $author_nicename, $author_nickname, $link );
 }
 return $link;
}

But wait, there’s more!

Now you have to get a proper value into the nickname field. Active Directory Integration makes this easy. In this plugin’s settings, go to the User Meta tab and enter this into the Additional User Attributes field: mailnickname:string:nickname. You’ll may need to replace mailnickname with your own Active Directory user attribute if it isn’t appropriate for you.

That’s it. The next time a user logs in, the nickname field is updated, and all future profile URLs for that user will not have a user ID.

Did Forrester Research CEO George Colony really say that?

According to CMS Wire, Forrester Research Chief Executive Officer George Colony said, “within 15 years CEOs will need to know the ins and outs of new media, social network technologies and social communities before they get the job.” (emphasis mine)

15 years? I’m scratching my head. The Web 2.0 is relevant today. E.g., Facebook has over 400 million users right now. Fifteen years from now passes through several generations of new technology!

For Colony’s sake, I hope CMS Wire misquoted or he misspoke. I’ll tweet him and see what he says.